Continuing his series on endodontics, Dr. Tony Druttman shows the importance of preparation
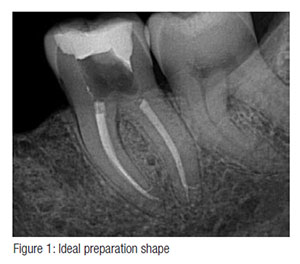
This is the article that brings the previous eight together, starting with knowledge of the anatomy of the root canal system. The primary purpose of root canal preparation is the removal of all vital and necrotic tissue, microorganisms and their by-products from the root canal system. This involves opening up the canal or canals to allow irrigants to reach as much of the root canal system as possible. It also permits shaping of the canal(s) to facilitate obturation (Figure 1). Many of the problems that clinicians experience with obturation are in fact due to incorrect canal preparation.
 Canal preparation is the area of endodontics that has gone through the most significant change in the last 20 years. The nickel-titanium revolution has made canal preparation so much easier, faster, and more predictable. Since the introduction of the first rotary files, there have been many developments that have reduced the number of files required and made the process more efficient. Two of the latest rotary file systems Reciproc® (VDW, Munich, Germany) and WaveOne® (Dentsply Tulsa Dental Specialties) claim that canals can be prepared with just one rotary file, and the Reciproc technique even claims that the use of hand files to prepare a glide path is not necessary. Another, the Self Adjusting File (ReDent Nova, Ra’anana, Israel) prepares the canal wall by adjusting itself to the contours of the canal. This is an interesting concept, and recent research shows encouraging results.1
 Like with everything else in life that claims that one-size-fits-all, there are those situations where the claims can be borne out, and those where they cannot, and it is important to understand the difference. Root canals come in all shapes and sizes, from the immature central incisor with an open apex to the severely curved canal, to the sclerosed canal that is only apparent in the middle third of the root. They all require a different approach, and this is what makes endodontics so challenging. Hand instrumentation is as important as it ever was, although nowadays instead of being used to prepare the whole canal, hand instruments are used predominately at the beginning to create a glide path and towards the end of preparation to gauge the size of the apical preparation.
The cleaning and shaping objectives are as follows:
- create a continuously tapering preparation
- have the narrowest diameter of the canal apically
- maintain the original anatomy of the canal centered within the preparation
- maintain the position of the foramen
- keep the foramen as small as is practicable
Creation of a glide path
 This is one of the most critical parts of the preparation sequence. With large canals, it is not a challenge, but with curved and sclerosed canals, blockages and ledges are either naturally present, or can all too easily be created even with the first instruments introduced into the canal. Once the canal entrance has been identified, a small K file (my preference is for a size 10 Maillefer FlexoFiles®) should be introduced through a well of sodium hypochlorite and gently advanced into the canal to about two-thirds of the estimated length. If any resistance is encountered, then smaller files, size 08 or even 06, should be used, and once these files move freely, then the size 10 is reintroduced.
There are many techniques associated with different rotary file systems, and the recommended sequence of instrumentation should always be followed. In an article of this nature, it is impossible to give precise advice for every situation that may be encountered, however, there are some basic principles that should be followed.
 Hand instruments should be used delicately. The tactile sense in the fingers is very refined, and with practice, it should be possible to read the canal. Placing a gentle curve at the tip of the file will often overcome a ledge. Excessive force is likely to ledge the canal further. In curved canals, an apical zip, or even a perforation, can be created as successively larger files are “screwed” into the canal in an attempt to maintain working length (Figure 2). The balanced force technique should be used. This requires the following sequence:
- Place the file into the canal and turn it 90 degrees clockwise, using light pressure
- Turn the file 120 degrees counterclockwise using firm apical pressure – this advances the file into the canal and cuts the dentin
- Turn the file clockwise in the canal without pressure to clean the canal
Patency filing
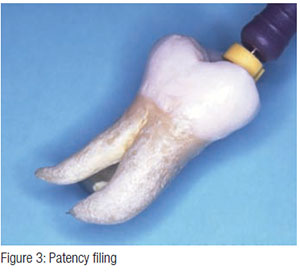
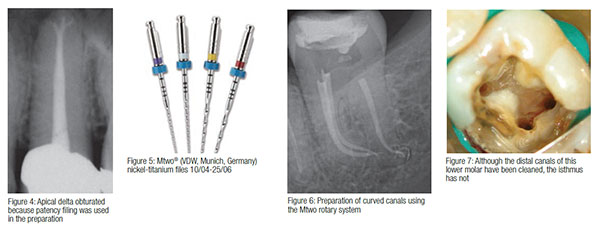
 This technique is predicated on the concept that the apex of the canal should be kept open to allow irrigants to reach the apex of the root, rather than creating an apical stop and blocking the terminus with dentin chips (infected or otherwise) [Figures 3 and 4]. The patency file (size 10) should be introduced no further than 1 mm beyond the working length and should be used at intervals in the preparation sequence to ensure that the apical constriction has not been blocked with debris.
Apical gauging
 The question, “What is the ideal size of the preparation?” is one that will be hotly debated for a long time to come. Some of the literature recommends larger apical sizes with a less tapered preparation,2 while other papers recommend smaller apical sizes and greater tapers.3 The decision will often depend on a variety of factors including the canal geometry, not only the dimensions, but the angle and radius of curvature. Another factor is the irrigant and irrigation technique. I have recommended in the previous article on irrigation, that it is important that the irrigant penetrates as far as possible into the root canal system. Once the canal has been prepared to a considered optimal size, for example with a size 25 rotary file with an 06 taper to the working length, a size 30 hand file (with an 02 taper) is placed gently into the canal. If resistance is met approximately 1 mm from the working length, then it should not be necessary to prepare the canal to a larger size. If it reaches the working length without resistance, then the master apical file size (the final size of file that is used to working length) should be increased.
Which rotary file system is best?
There is no best system for everyone. This is like asking which is the best car — we all have our favorites (Figures 5 and 6). In my opinion, the best file system should have the following features:
- Cut efficiently
- Have great strength and flexibility
- Be safe to use
- Have enough instruments in the range to be used in the majority of situations
- Have a safe cutting tip, so as not to over enlarge the apical preparation
- Be versatile enough so that the instrument can be used by hand when necessary
- Can be pre-curved to overcome ledges (when used by hand)
The best way to evaluate a system is to read the literature about it, decide what features and benefits are important to you, and then try the system. It is important to follow the manufacturer’s recommendations and to use the appropriate type of motor and handpiece. As new instruments are being developed, re-evaluation is advisable.
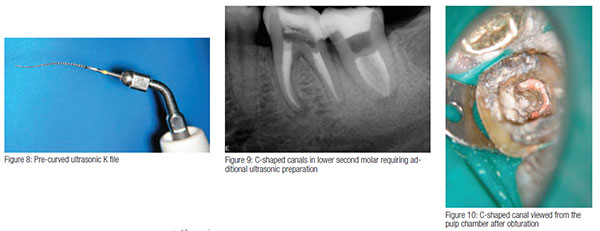
It is important to remember that because a canal has been prepared to a certain length, with a file of a certain size and taper, that does not mean that the canal system is clean (Figure 7). Many canals are irregular in cross section and may have areas such as an isthmus between canals that harbor necrotic tissue and bacteria.4 A variety of preparation and irrigation techniques and armamentaria have to be used to ensure optimal canal cleanliness. My own preference is to use an ultrasonically energized K file, which can be adapted to the canal curvature (Figures 8-10). Areas of the canal system that have not been cleaned adequately with rotary instrumentation can be visually identified with the use of the operating microscope and addressed in a controlled manner with ultrasonics.
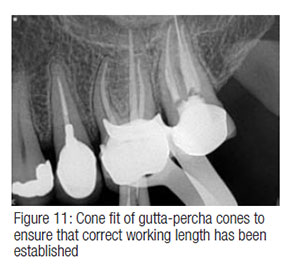
During preparation and before the canals are obturated, the canal length should be checked. This is particularly important with curved canals, because as the size increases, the working length may reduce. This can be done either by rechecking working lengths electronically or radiographically by cone fitting the gutta-percha points (Figure 11).
In conclusion, the careful use of both hand and rotary instrumentation will deal with many of the situations that we are faced with. It is important to understand the anatomy of the canal system and to “read” both the canals and the instruments. When canal preparation is done in a controlled and considered way, obturation is a relatively straightforward matter.
 Tony Druttman, MSc, BChD, BSc, is an endodontist working in central London. He is also a part-time teacher at the Eastman Dental Institute, University of London, and lectures in the UK and abroad.
- De-Deus G, Souza EM, Barino B, Maia J, Zamolyi RQ, Reis C, Kfir A. The self-adjusting file optimizes debridement quality in oval-shaped root canals. J Endod. 2011;37(5):701-705.
- Usman N, Baumgartner JC, Marshall JG. Influence of instrument size on root canal debridement. J Endod. 2004;30(2):110-112.
- Yared GM, Dagher FE. Influence of apical enlargement on bacterial infection during treatment of apical periodontitis. J Endod. 1994;20(11):535-537.
- Wu MK, R’oris A, Barkis D, Wesselink PR. Prevalence and extent of long oval canals in the apical third. Oral Surg Oral Med Oral Pathol Oral Radiol Endod. 2000;89(6):739-743.
Stay Relevant With Endodontic Practice US
Join our email list for CE courses and webinars, articles and more..
