Dr. John West delves into an advance in NiTi technology
Introduction
The great endodontist is curious, collaborative, and courageous.1
The likely reason you are reading this article is mainly because of one of the three “c” words in my opening sentence: curious.
Every endodontist and every endodontic clinician in the world wants to distinguish himself or herself; to set them apart from the rest of the pack. Characteristics of a great endodontist include having good bedside manner, understanding your job is to help grow the success of the referring dentist, and being a brilliant diagnostic and treatment plan decision-maker. The most critical distinction, however, is the quality of your technical skills. For referring restorative dentists, this is what truly matters. Clinical performance is the metric by which dentists measure the quality of your endodontic skills. This article is about the consistent quality of endodontic radicular shaping resulting in predictable and appropriate preparations for the structural root anatomy which surrounds and reflects the original canal size, shape, and contours. The great endodontist is like a great master: His/her learning is founded on curiosity. You are always a student, and you are always willing to “test” new products, technologies, and techniques against your current best skills and practices. You are always in the internal conversation: “Am I missing anything that can enhance both my standard of care and/or my level of care?”

ProTaper Gold has redefined the way we shape and experience root canal system’s radicular preparations.2 The world’s No. 1 Rotary System has just gotten better. Advances in NiTi metallurgy technology have, indeed, revolutionized endodontic shaping files. This article will walk you through a game-changer technology that will profoundly improve your ease and efficiency of clinical canal preparation. After over 1 year of our 100% converting from ProTaper Universal (PTU) to ProTaper Gold (PTG), I can tell you neither I nor my two sons, Jason and Jordan, with whom I practice, have never looked back. And believe me; we have wanted from time to time to revert back to PTU because we have thousands of opened ProTaper Universal files that cannot be returned for Gold! Try as we might, however, we haven’t had an endodontic situation yet where it was better to substitute the old metallurgy of PTU for the new, more flexible metallurgy of PTG!
This article may, at first glance, appear to be self-serving because I was one of the original ProTaper Designer Team members along with Dr. Cliff Ruddle and Professor Pierre Machtou, and we have financially benefited from the sales of the world’s No. 1 Rotary System. But this article is not about money; it is instead about my personal journey of liberation from the previous fears and concerns of NiTi shaping. In 1995, the idea of progressive/regressive tapers on a single file was a desired geometry in the endodontic-shaping world that would provide decisive and intentional progressive or sectional shaping of the radicular endodontic preparation. At the time, endodontics needed a Rotary System that gave the dentist control of the Rotary shaping versus the file being in control. Progressive tapers allow for selective shaping where fixed tapered files cut wherever the file choses, not where the clinician choses. Understanding the geometries and Directions for Use (DFU) of ProTaper Shapers versus Finishers has allowed clinicians worldwide to produce predictable, elegant, and anatomically correct shapes. Perhaps even more important than the shaped preparations, however, is that clinicians are reporting they are in control of the procedure and preparation.
The ProTaper value has been sustainable and growing in spite of dozens and dozens of NiTi file systems that have come and gone over the last 15-plus years. Now copycats are pouring in, and comparisons by independent studies have begun in a quest to fetter out the clinical truths. This is fertile ground for endodontic residents who are looking to write a master’s thesis. Meanwhile, I encourage all clinicians to perform head-to-head comparisons evaluating performance, quality, and predictability of the newcomers. The great endodontists know that the best education in the world is their own.
For the endodontists who perform at their highest standard of care, their choice of “tools” and technique always have simple and profound metrics: Performance, quality, clinical results, and company support often trump cost. After all, if your files cost you $50 versus $25, and the treatment fee is $1,000 (plus or minus), then saving $25 is false economy. This false focus on cost of production is profoundly true if you have not done your homework to test the quality of a cheaper product. The biggest value the endodontist has to protect, nurture, and grow is his/her reputation. Dentists can look at your pretreatment and posttreatment images, and they know the difference between “Wow” and “What the heck; I could have done that myself,” or worse yet, the general dentist may even think that “I could have done better than that.” When the dentists cannot detect a difference, what value are you to them? They may as well keep the treatment in-house! How can you blame them?
OK, if it is not about the money, and it is not self-serving, why should I write an article about conversion from ProTaper Universal to ProTaper Gold? The answer is simple: I want you to enjoy the newfound confidence that I and many others have discovered shaping canals with a forgiving yet more efficient metal. It is not good enough that my sons and I can do these things. It only matters that you can do these things, and I believe you can do whatever you decide to do. I have lost my fear of the catastrophic spontaneous fracture that has happened to all of us from time to time even with a perfect Glidepath, new files, a light touch, and an unhurried treatment appointment time. Though we are all capable of breaking any NiTi file, those days are over for me as well as anyone who dares to get out of the way of your ego or whatever artificial wall is stopping you from taking your safe and predictable endodontics to a new level.
My journey of converting from ProTaper Universal to ProTaper Gold
I will now walk you through my own journey from ProTaper Universal to ProTaper Gold and how you too can discover the same competency, consistency, safeness, control, and confidence I have enjoyed.
The experience of my endodontic day has completely changed. I still produce the same PTU shapes, but they are safer and actually better. The shapes more precisely replicate the original root canal system flow. But the biggest difference is what I feel in my gut — patient after patient. As my son, Dr. Jordan West, first described this feeling over a year ago, “PTG has changed my experience of shaping curved, calcified canals from Fear to Fun!” Fun is the best word I can think of to describe what it is like treating one PTG endodontic patient after another. The enjoyment level has skyrocketed because I AM fearless. Looking from a different perspective, I believe the PTG feeling can be summarized in a single word: Energy. You will notice a palpable difference before, during, and at the end of your day. Instead of feeling emotionally wasted due to fear of breakage, you will be emotionally energized. Your staff and patients will notice, but most of all, the person in the mirror will be smiling back at you during and at the end of the day because you are a safe Shaping Master.
How can this be true, John West?
Why convert to ProTaper Gold?
The why of gold technology is simple for three reasons:
- Improved shapes that are structurally appropriate for predictable cleaning disinfection, conefit, and obturation.
- Safer shapes because Gold metallurgy allows files to “follow” existing canal walls and carve only the necessary dentin to replicate the shape of the Finishing file. ProTaper Universal, being somewhat stiffer, had a tendency to “plow” a shape versus to sculpt a shape.
- Greater efficiency since less “work” or shaping has to occur.
Being able to experience newfound skill and confidence in safe and predictable shaping produces a confidence, a swagger, and an ease that had not been possible until now.
Three PTU/PTG conversion patient examples
Let me share three learning patients who stick in my memory. First, I vividly remember Bill (Figures 2A and 2B). Bill presented with a pulpitis in his mandibular right first molar. I took one look at Bill’s pretreatment image when I was then in my PTU era, and I could not seem to escape my self-talk that went something like this: “I do not want to break a file!” In a real way, I dreaded the day Bill was going to return for the clean, shape, and pack visit. When he did return, I must have used a dozen or more new PTU S1’s and S2’s for fear I would break one. I had a good Glidepath and even used the Shapers manually to be safer. I usually don’t sweat, but I was sweating. I could not get away from my negative thoughts about breaking a file. When I came to the F1, I never could get up enough courage to “follow” the F1 to the S1/S2 length. If you look at the final result, you can tell that I never did use a Finishing File, and my radicular preparation is undershaped.
I now fast-forward to patient Dorothy a few months ago. I was now deep into my ProTaper Gold conversion and had long forgotten Bill’s molar (Figures 2C and 2D). While Dorothy’s mandibular right first molar was similar to Bill’s, my experience was completely different from his. There was no fear or even a conversation about fear. I didn’t even think about it. The PTG performed flawlessly, F1 was easily and confidently “followed” to length, and only one PTG F1 was used. The dentin-filled apical flutes of the PTG F1 confirmed F1 shaping was finished, and the conefit validated the shaped canal was ready for flawless 3D obturation. Notice the appropriate size, shape, and flow of Dorothy’s four canal preparations. And the best thing of all, I experienced an ease and confidence in Dorothy’s treatment. I felt liberated from the fear of fracture and energized with the joy of control. There was a real sense of freedom.
The third patient who was telltale for me was Rodney. As endodontists, we know one of the most challenging canal anatomies to shape is an abrupt apical turn or hook. Blocking or ledging can often result. The endodontist may be able to slip and slide to length with a small manual file, but when the Rotary files are used, everything can fall apart (Figure 2E). Notice the PTG S1 resides properly at the radiographic terminus. The Rotary PTG F1 “follows” to exactly the same PTG S1/S2 position, and the mesial conefit resides in the perfectly shaped apical cradle (Figure 2F). Oblique and perpendicular posttreatment images confirm preservation of the position of the original portal of exit (POE) — i.e., there is no apical internal or external POE transportation. And yes, no fear!
These three patient examples illustrate the process of my journey from PTU to PTG. The challenge is to decide to “just do it!” Once the PTU to PTG plan is implemented, for those who proceed, it is truly practice altering.

How to convert to ProTaper Gold?
This part of testing the transition from PTU to PTG is easy. I will also describe the nuances of how to use the PTG Shapers versus Finishers.
PTG nuances
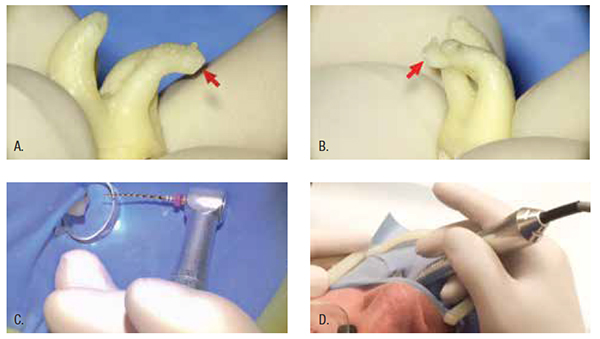
In order to demonstrate PTG versatility, I have chosen to demonstrate in a maxillary molar with a double “S” curve. The root and its canal travel both distal and buccal (Figures 3A and 3B). The clinical goal is to preserve the position of the radicular POE and can be measured by the radiographic image at conefit. Careful attention is paid to the technique for holding the electric headpiece during Shaping and Finishing. For many endodontists, this is an entirely new muscle memory. The index finger is the most dangerous finger in Rotary as well as Reciprocation. Cradle the handpiece for both maxillary and mandibular teeth. Hold the handpiece as if it were a cigar between the index finger and middle finger as seen in a patient’s maxillary tooth (Figure 3C) or between the index finger and thumb for the mandibular teeth (Figure 3D). In this way, your finger and/or hand do not direct the handpiece, and the file is left to freely “follow” the Glidepath to length. The weight of the handpiece is sufficient to urge the Shapers and Finishers to do what they are designed to do.
PTG technique
- Start: Purchase or trade in a dozen unopened PTU packages for PTG packages (Figure 1).
- Access: Remove chamber dentinal triangles to design unfettered access into root canal system preferably using the forgiving PTG SX, which has an extraordinary capacity to cut where the dentists want to cut versus a stiffer PTU SX type file that cuts more indiscriminately against multiple, or worse yet, all walls, including walls near furcal danger.
- Glidepath: Prepare a Glidepath using a loose No. 10 or No. 15 manual file or expand with mechanical ProGlider to length confirming the reproducible Glidepath is secure and ready for PTG rotary.
- Shape: Shape with PTG Shapers S1 and/or S2. Shapers are used to expand the Glidepath by removing coronal radicular restrictive dentin where present. First, gently follow PTG S1 into canal and then Brush laterally and Follow to length (Figures 4A and 4B). If length is not easily reached, remove file, clean flutes, irrigate, and proceed until length is reached. Remove PTG S1 from the preparation, and inspect flutes. Typically, flutes will be filled in the coronal portion of S1 confirming coronal restrictive radicular dentin is removed (Figure 4C). Proceed in the same PTG S1 Brush/Follow manner with PTG S2 (Figures 4D and E). Inspect S2 flutes after “following” to length, and note restrictive radicular dentin is typically removed where intended at midroot (Figure 4F).
- Finish: Follow PTG F1 into canal until dentin is engaged, and then Brush out. Repeat Follow/Brush method (opposite of Shapers which is Brush/Follow) until length is reached (Figure 5D). If apical flutes are free or partially free of dentin as seen in Figure 5D, this is your cue to proceed with PTG F2 in exactly the same way as PTG F1 until length is reached (Figure 5H). The lack of dentin in the apical flutes indicates the F1 prep is incomplete; it is NOT finished. This is your indicator to proceed with F2. After the Follow/Brush repetition to length, remove F2 and inspect apical flutes for proof that F2 apical flutes contain dentin which confirms the F2 shape is present, and the F2 canal preparation is finished and ready for conefit (Figure 5I). Radiographic image confirms proper conefit (Figure 5J). After final disinfection cleaning protocol, obturate root canal system.


Is ProTaper Gold for me?
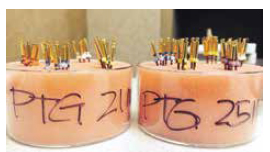
with 21 mm files and one with 25 mm files. Place both banker sponges in ONE of your treatment operatories and leave it there. For a week compare the PTG operatory with you current preferred NiTi files. Take notes about your compared experience and at or before the end of your week, you will know the answer to “Is ProTaper Gold for Me?”
Take the PTG challenge. The easiest and simplest way to test PTG against your current preferred NiTi system is to load two banker sponges (one 21 mm and one 25 mm) and place in only one of your treatment operatories for at least a week. Use them for all cases in that operatory (Figure 6). Take notes on how PTG performs against your current preferred file system. Remember, the best education in the world is your own. At the end of the week, it will not matter what I have said; what the endodontic reps have said; what the advertisements have said; or what the literature has said. You will know the truth. Your truth!
Take-aways
This article is completely biased. Why? The reason for my bias is that my goal is to share with you, the reader, a little bit about my PTU to PTG journey. I have had a few journeys over my four decades of wanting to perform at my highest level, but none have been more satisfying and rewarding than this one. And now I invite you to have your own PTG experience.
Take-home message: Remember to Brush then Follow on your way down the canal with the Shapers, and do the opposite with the Finishers: Follow then Brush your way out.
Change can be difficult, but discovering truth through understanding and your own education can make the journey of change not only possible, but also rewarding and blissful.
“Education is the most powerful weapon which you can use to change the world.”
— Nelson Mandela
- West J. Three Guidelines for Becoming a Great Endodontist. AAE scientific presentation; April 2015; Seattle, Washington.
- West JD. Ni-Ti Goes GOLD: “Ten Clinical Distinctions.” Dent Today. 2015;34(4):66-71.
Stay Relevant With Endodontic Practice US
Join our email list for CE courses and webinars, articles and more..
