Dr. John Rhodes presents an interactive practical and problem-solving solution by discussing simple glide path management
When preparing challenging root canals with nickel-titanium rotary and reciprocating instruments, it is important to establish a reproducible and predetermined pathway for the instruments to follow: the glide path.
[userloggedin]
The glide path
Modern nickel-titanium preparation techniques provide a very efficient means of rapidly tapering the primary root canals prior to disinfection, but negotiating complex anatomy such as sclerosed canals or severe curvatures can be difficult. Iatrogenic errors that can occur during preparation include transportation, perforation, and instrument fracture, and can be avoided by ensuring that the rotary or reciprocating instruments have a predetermined and reproducible path to follow. An infected, blocked canal could result in a persistent inflammatory response and failure of treatment.
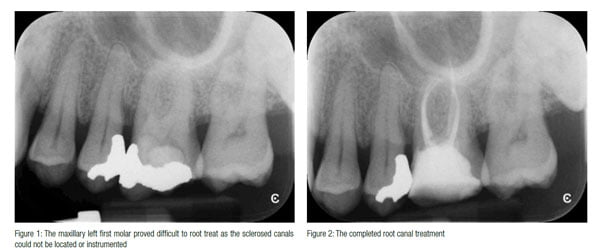 The glide path must respect the original anatomy of the primary canal, ensure patency, and be reproducible. Generally, the glide path does not need to be bigger than an ISO size 010 hand file, and indeed, as nickel-titanium instruments are more flexible than stainless steel, they are the instrument of choice in curved canals, as they tend to remain centered and avoid straightening of the canal. In this case, a glide path was prepared using READY•STEEL® (Dentsply Maillefer) hand files ISO sizes 006 and 010. Several steps will make the process of preparing challenging canals more achievable, as outlined below.
Coronal seal
It is important to assess the quality of coronal seal before embarking on root canal treatment. In this case, the coronal restoration consisted of multiple restorative materials and was undoubtedly allowing microleakage. It was, therefore, imperative that the existing restoration was removed before root canal treatment started. Removing a restoration also gives much better visualization of the pulp floor and access to the canal orifices. It is not necessary to build up the tooth at this stage as it can be adequately isolated with good rubber dam technique. Placement of a dentin-bonded core after obturation and with rubber dam isolation allows much greater control of the operative field and avoids contamination with saliva, which can have a seriously detrimental effect on the complex chemistry of dentin-bonding agents.
Decoding the pulp-floor map
Carious dentin and the roof of the pulp chamber were removed with a tungsten carbide LN bur (Dentsply Maillefer), using a light brushing technique. The pulp floor tends to be darker than the walls and is a useful guide for locating the canal orifices. In the maxillary first molar, there is often a lip of dentin covering the second mesiobuccal canal that needs to be removed in order to locate the orifice. Once the primary mesiobuccal canal was located, a smaller LN bur was used to trough between the MB1 and MB2. The orifice of the MB2 was confirmed with a DG16 endodontic probe.
Establishing a glide path
The canal orifices were gauged with an ISO size 010 READY•STEEL flexible stainless-steel hand file. Primary coronal flaring was then completed using a ProTaper Gold® SX (Dentsply Sirona) instrument. The canals were flushed with 3% sodium hypochlorite.
The working length was estimated using an apex locator, EDTA lubricant (File-Eze®, Optident), and an ISO size 006 READY•STEEL hand file. The file is used with a watch-winding action and occasionally a small amplitude filing action to define the path to the apex. Once the apex locator reaches the zero reading, the working length is measured against a reproducible reference point. The glide path was enlarged with an ISO 010 READY•STEEL hand file, using a similar action and followed by copious irrigation with sodium hypochlorite. EDTA-based lubricants and gels are generally contra-indicated during preparation with nickel-titanium rotary or reciprocating instruments but can be invaluable for initial negotiation and scouting of the root canal when estimating the working length.
Tapering the canals
Once a glide path has been established, rotary or reciprocating instruments can be used to rapidly and predictably taper the canal. In this case, preparation was carried out with a single Primary WaveOne® Gold (Dentsply Sirona) instrument. The canals were prepared to approximately two-thirds of the length in one pass. Patency was confirmed with an ISO size 010 file. The glide path had to be re-established in the mesiobuccal canals at which point a diagnostic radiograph was exposed to confirm the lengths and preparation completed.
Irrigation
The root canals were irrigated using 3% sodium hypochlorite agitated with an EndoActivator® (Dentsply Sirona) in a pumping action.
Obturation
The root canal system was obturated using a vertically compacted gutta-percha technique and AH Plus® sealer (Dentsply Maillefer).
Coronal seal
Immediately after obturation, and under rubber dam isolation, a core was constructed using dual-cure composite and a fiberglass post in the palatal canal. The general dentist will restore the tooth with a cusp-coverage restoration.
To see how these steps were applied, visit https://www.youtube.com/watch?v=PSry TgehepU or search Youtube for “Endo Practice – simple glide path management.” The author is happy to answer questions directly via Youtube or Twitter @johnrhodesendo.
[/userloggedin]
[userloggedout][/userloggedout]
 John Rhodes, BDS(Lond), FDS RCS(Ed), MSc, MFGDP(UK), MRD RCS(Ed), is a specialist in endodontics, the author of textbooks and numerous papers, and owner of The Endodontic Practice Poole and Dorchester (England). He lectures and teaches on endodontics nationally.
Stay Relevant With Endodontic Practice US
Join our email list for CE courses and webinars, articles and more..
