Drs. Rupali Balpande, Amil Sharma, Sarvesha Bhondwe, and Gayatri Deshmukh used a Z-plasty to achieve an esthetic restorative result.
Drs. Rupali Balpande, Amil Sharma, Sarvesha Bhondwe, and Gayatri Deshmukh, along with Satakshi Bartere, discuss an esthetic restorative procedure
Abstract
Patient demands for esthetic dentistry with minimally invasive procedures and immediate results are increasing. The esthetics of patients’ teeth have taken on a greater importance in today’s day-to-day life. A midline diastema is an esthetic problem arising in the anterior zone with high esthetic demands by those patients who are dissatisfied with their smile. This case report discusses a patient with a diastema in the anterior region with a high-frenum attachment. The patient was treated with Z-plasty technique of frenectomy to remove the etiological factors causing the midline diastema, followed by porcelain laminate veneers for esthetic closure of the midline diastema.
Introduction
Midline diastema refers to any spacing or gaps existing in the midline of the dental arch. A midline spacing can be associated with many etiological factors, including tooth width, arch length discrepancy, abnormal frenum attachment, pressure habits, midline pathology, or an iatrogenic racial predisposition, among other factors. Multiple options are available to treat problems arising in the esthetic zone.1 Each treatment modality offers some advantages and disadvantages. The use of ceramic veneers to resolve esthetic and/or functional problems has been shown to be a valid management option, especially in the anterior esthetic zone. The techniques and the materials employed to fabricate ceramic veneers offer satisfactory, predictable, and lasting results.2
For patients having a high frenum attachment at or near the center of the crest, frenectomy is advised to remove the etiological factor causing the diastema. Frenectomy is complete removal of the frenum, including its connection to the underlying bone, and may be required in the rectification of an abnormal diastema between the maxillary central incisors. When the frenum and its crestal attachment are not fully removed, relapse of the diastema may result even with restoratively filling the space between the central incisors. In the current case, the frenectomy was performed through a Z-plasty procedure — a plastic surgical technique used to recover the functional and cosmetic appearance of scars. It comprises a central incision and formation of two triangular flaps of equal dimension that are then swapped to prevent or limit scar formation and promote healing.3
Z-plasty technique

A “Z”-shaped incision is made with a scalpel or laser (practitioner preference) with the frenum oriented at the vertical aspect of the incision (Figure 1A). The incisions are extended to the underlying bone through the periosteum and are full thickness. This creates two flaps (flap 1 and flap 2). Any fibrous tissue at the frenum is excised to prevent frenum reattachment following soft tissue healing. Once the flaps have been mobilized, the apex of flap 1 is repositioned inferiorly, and the apex of flap 2 repositioned superiorly (Figure 1B). The repositioning prevents contracture of the soft tissue during healing from frenum re-establishment, defeating the purpose of the intended treatment. Transposition of these triangles redistributes tension on the wound and changes central limb direction. The flaps are then fixed in their new positions using simple interrupted sutures (Figure 1C).
Case report

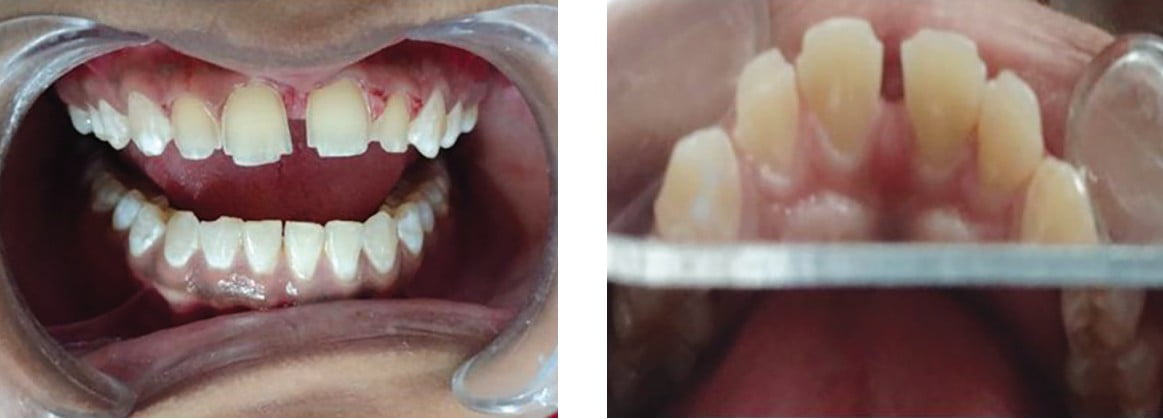
A 21-year-old male presented with a primary complaint of spacing between his maxillary central incisors (diastema) and a desire to improve the esthetics of his smile. Examination determined the cause of the diastema related to an abnormal frenum attachment. Periapical radiographs were taken, and no osseous pathology was noted that could be contributory to the diastema. The frenum presented as a wide band attaching to the facial aspect of the crestal midline (Figure 2).
The patient was informed that to correct the esthetic issues, excision of the frenum would be required, followed by placement of ceramic veneers to widen the central incisors, thus eliminating the midline gap. Following the patient’s acceptance of the treatment plan, impressions for diagnostic models were taken and models fabricated. The models were studied to decide the shape and size of the restorations to be placed with help of a diagnostic wax-up.
The patient presented for treatment, and 2% lidocaine with epi (Lignox® 2%, Warren) was administered with infiltration into the labial aspect and palatal aspect of the anterior maxilla. A surgical marker was used to outline the planned Z incision on the labial aspect of the premaxilla at the frenum. An incision was made across the base of the frenum at its attachment to the incisive papilla. The incision was extended to the periosteum with the vertical aspect of the incision down the center of the frenum, and then a superior incision was made at the depth of the vestibule in the opposite direction as the horizontal incision made at the inferior aspect of the frenum. The lateral incisions were made at a 45° angle to the vertical frenum incision, creating two triangular flaps of equal size and shape (Figure 3). The incision was then extended superiorly along with removing the interradicular bone between the teeth at the midline. Following elevation of the full-thickness flaps, removal of fibrous tissue across the alveolar ridge between the teeth at the midline diastema was performed. Adequate undermining of surrounding tissues was performed to achieve proper mobilization of the flaps and minimize distortion of the underlying soft tissue. The two flaps were then transposed to the opposite side of apex of each flap. The newly repositioned flaps were then secured in their new position with simple interrupted sutures. The vertical incision on the attached gingival was also closed by suturing (Figure 4).


Antibiotics and analgesics were prescribed (CLAVUM® antibiotic 625 mg, Alkem Laboratories Ltd.; analgesic/NSAID Zerodol® P, Ipca laboratories, Ltd.), and routine wound care instructions were given to the patient. The patient returned at 7 days postsurgically for suture removal. At 1-month postsurgically, the wound was re-examined, and healing without complications was noted. The patient was referred to his restorative dentist for completion of treatment with the planned ceramic veneers.
The restorative phase of treatment consisted of preparation of the maxillary central and lateral incisors bilaterally. Local anesthetic was administered and depth orientation grooves were placed with a diamond in a high-speed handpiece on the facial surface of the teeth to be treated to a depth on the gingival half (0.3 mm) and incisal half (0.5 mm), respectively. The tooth structure between the depth orientation grooves was removed with a round-end tapered diamond. A chamfer finish line was placed slightly subgingivally. Interproximally, the tooth preparation was extended into the contact area but terminated facial to the contact area. The preparation on the incisal edge was to provide a margin on the lingual aspect that would be less susceptible to chipping during functional use. Additionally, this provides a vertical stop to aid in seating the veneer in the planned position. It is possible without the incisal overlap that the veneer may be luted either too incisally or gingivally, affecting the desired esthetics. The lingual finish line was created with a round-end tapered diamond, approximately one-fourth the distance between the incisal edge and gingival connecting the two proximal finish lines. The finish line should be a minimum of 1 mm away from centric contacts to prevent veneer chipping during occlusion. The preparation design extending onto the lingual surface enhances mechanical retention of the veneer, increasing the bonding surface area. All sharp angles of the preparation were rounded to prevent stress concentrators in the finished veneer.
A coat of dentin bonding agent (Adper™ single bond, 3M ESPE, St. Paul, Minnesota) was applied to the prepared tooth surfaces immediately after preparation and light-cured. After gingival retraction (Ultrapack™ No. 00; Ultradent, South Jordan, Utah), the impression (3M ESPE) was made with polyvinylsiloxane by putty-wash technique using an impression tray (GDC® edentulous impression trays). The shade was selected under direct sunlight with VITA 3D-Master®, (Yorba Linda, California) shade guide (Shade A2). Temporary restoration was done with light-cured composite resin. The diagnostic wax-up was used to fabricate a matrix for making provisional restorations. Spot-etching of enamel with phosphoric acid gel for 30 seconds was performed at mid-central locations on facial aspects of teeth. Bonding resin was applied on the etched spots and light-polymerized. The matrix was loaded with provisional veneer material (Luxatemp®, DMG America, Ridgefield Park, New Jersey) and secured in place over the prepared teeth. After 3 minutes, the matrix was then lifted off with a sickle scaler, and trimming of excess material was carried out with a carbide bur. Occlusion was checked and adjusted accordingly.
At the next appointment, the temporary veneers were removed; the teeth were cleaned using pumice in a prophy cup in a slow-speed handpiece and were isolated and air-dried. The IPS e.max® (Ivoclar Vivadent, Amherst, New York) ceramic veneers were tried on to the teeth with a try-in paste (Luxatemp, DMG America) in the selected shade of the veneers requested to verify shade and restoration fit. The esthetics and fit were found to be acceptable, and the veneers were removed from the teeth, rinsed thoroughly, and dried. The interior of the ceramic veneers were etched with 5% hydrofluoric acid (IPS Ceramic etching gel, Ivoclar Vivadent) for 20 seconds and then rinsed under running water and air-dried. A layer of saline coupling agent (Monobond S, Ivoclar Vivadent) was applied to the interior surface of the veneers and gently air- dried after 1 minute. The saline coupling agent forms a chemical bond between the ceramic and resin luting materials to be used, reducing marginal leakage potential and resin luting discoloration. The salinized surface was then coated with a thin layer of Adper single bond and then air-thinned with the air syringe. The resin layer was light-polymerized for 40 seconds. The prepared teeth were then etched with a 37% phosphoric acid gel for 30 seconds, rinsed thoroughly, and air-dried. A layer of bonding agent (Adper single bond) was applied to the tooth surfaces. A dual-cure resin cement (Variolink® II, Ivoclar Vivadent) in the selected shade of base paste and catalyst paste was mixed and applied into each veneer. The veneers were then positioned on to the teeth with slight pressure and excess cement at the margins removed with a brush. The veneers were tack cured at the center of each veneer for 10 seconds.
After the initial set, the remaining excess cement was removed with a No. 12 Bard-Parker® blade. Light-curing was continued to complete resin polymerization for 60 seconds per veneer by directing the light initially from lingual side so that the resin cement shrinkage would be toward the tooth. Then each veneer was light-cured for 40 seconds from the labial. Margins were checked with an explorer to verify that all residual resin was removed, and the occlusion checked to ensure that no contact existed on tooth-ceramic margins. The patient was shown a mirror and expressed satisfaction with his new smile.
Discussion
Treatment planning for diastema correction should include consideration of orthodontic closure, restorative therapy, surgical correction, or multidisciplinary approach depending upon the cause of the diastema.2 The restorative closure of diastema can be achieved by using direct composite veneers, indirect composite veneers, ceramic laminate veneers, all ceramic crowns, metal ceramic crowns, or composite crowns.4

Composite resin and ceramics are the most frequently used veneering materials for diastema closure providing a more conservative approach than full-coverage restorations. Smaller diastema may be closed with micro-filled and hybrid composite resins if the diastema is 1.0 mm-1.5 mm in width. One of the greatest advantages of ceramic veneers is that they are extremely conservative in terms of tooth reduction with some cases being able to be performed with no tooth reduction and others with minimal reduction. In the current case, only 0.5 mm reduction on the labial surface was required. This minimal reduction rarely, if ever, leads to pulpal involvement — a major advantage that also preserves enamel for bonding under the veneer, allowing for higher bond strengths and dentin bonding. The highly glazed surface of the porcelain laminates prevents plaque accumulation, considered important to attain a healthy periodontal response. Additionally, ceramic has better luster maintenance over time then composite with less potential for surface staining. Excellent esthetics can also be achieved due to the lifelike appearance of ceramic (better translucency then composites) and light-scattering effect of the luting cement.1,2,4
The high frenum attachment, being the etiological factor of the diastema, was planned for removal via a surgical approach. With the Z-plasty technique, it is possible to redirect a scar into better alignment with natural skin folds or the lines of least skin tension. Basic Z-plasty flaps are created using an angle of 60° on each side.5 Classic 60° Z-plasty lengthens scars by 75%, while 45° and 30° designs lengthen scars by 50% and 25%, respectively. The Z pattern is effective as it promotes redistribution of tension on the soft tissue and the wound, which helps in healing along the soft tissue lines. This helps in minimizing scar formation and has a camouflaging effect to the incision upon healing.

A curvilinear form of Z-plasty (referred to as S-plasty) may be used when straight lines may be particularly obvious, such as in the cheek. Design of the Z-plasty with unequal angles and limbs creates a situation in which the smaller triangle moves significantly less than the larger triangle. This may be useful in areas where small amounts of tissue need to be moved with as little distortion as possible (e.g., near eyes, lips).6 Labial frenectomy can be performed before, during, or even after the orthodontic closure of the maxillary midline diastema depending on the individual case. Koora K,7 reported a case of spontaneous closure of a midline diastema after 2 months following frenectomy in a 9-year-old girl. The same procedure can also be done through lasers as performed by Olivi G8 using an Er,Cr:YSGG (erbium, chromium: yttrium, scandium, gallium, garnet) laser at a power setting of 1.5 W or less and 20 to 30 pulses per second and by Puthuserry9 using carbon dioxide laser, but it is expensive and still not routinely available in our country. A diode laser may also be used as an alternative to the Er,Cr:YSGG laser.
Conclusion
The predictability of any restorative process will rest on the precise evaluation of oral and occlusal conditions. The veneers are technique- and material-sensitive, but if used with proper knowledge and skill, these restorations provide the best esthetic and functional outcome. The key in diastema closure is proper evaluation of the frenum involvement and management of this so that the resulting restorative treatment is stable long-term, and reoccurrence of the diastema does not result.
https://endopracticeus.com/clinical-articles/endodontic-retreatment-a-conservative-and-predictable-therapy/.
- Viswambaran M, Londhe SM, Kumar V. Conservative and esthetic management of diastema closure using porcelain laminate veneers. Med J Armed Forces India. 2015;71(Suppl 2):S581–S585.
- Dlugokinski MD, Frazier KB, Goldstein RE. Restorative Treatment of Diastema. In: Goldstein RE, Hoywood VB, eds. Esthetic in Dentistry (Vol. 2). 2nd ed. London: BC Decker Inc.; 2002.
- Burke M. Z-plasty. How, when and why. Aust Fam Physician. 1997;26(9):1027–1029.
- Dumfahrt H, Schäffer H. Porcelain laminate veneers. A retrospective evaluation after 1 to 10 years of service: Part II-Clinical results. Int J Prosthodont. 2000;13(1):9-18.
- Salam OA, Amin JP. Michigan State University College of Human Medicine, East Lansing, Michigan. Am Fam Physician. 2003;67(11):2329-2332.
- Koc MN, Orbay H, Uysal AC, Unlü RE, Sensöz O. Z plasty closure of lower lip defects after tumor excision. J Craniofac Surg. 2007;18(5):1120-1124.
- Koora K, Muthu MS, Rathna PV. Spontaneous closure of midline diastema following frenectomy. J Indian Soc Pedod Prev Dent. 2007;25(1):23-26.
- Olivi G, Chaumanet G, Genovese MD, Beneduce C, Andreana S. Er,Cr:YSGG laser labial frenectomy: a clinical retrospective evaluation of 156 consecutive cases. Gen Dent. 2010;58(3):e126-e133.
- Puthussery FJ, Shekar K, Gulati A, Downie IP. Use of carbon dioxide laser in lingual frenectomy. Br J Oral Maxillofac Surg. 2010;49(7):580-581.
Stay Relevant With Endodontic Practice US
Join our email list for CE courses and webinars, articles and more..
