Dr. Sonia Chopra describes her treatment of avulsed teeth in a teenager, and how using calcium hydroxide was an important part of the process.
Dr. Sonia Chopra illustrates her treatment of tooth avulsion in a teenager
Dental trauma is unfortunate and can be scary for patients because it can happen to anyone and at the most inopportune times. As a dental provider, I am so happy that I know the exact steps to handle this situation so I can help a patient (or loved one) through the chaos of a traumatic incident. I invite you to share this knowledge with all of your patients too — you never know when they may need it.
In my opinion, the most traumatic of all dental injuries is the avulsion, when the tooth is completely dislodged from its socket, aka, “the knocked out tooth.” This type of injury typically happens to young children in the anterior region of the mouth, so it is not just traumatic for the child, but for the parent as well. As a mother myself, I can empathize. With the knowledge that I have, I can feel confident that everything will be okay. Being able to tell a parent, “We can fix this,” is pure gold in a moment like this. However, we must adhere to a particular protocol to be able to guarantee such a tall order. In conversation, the clinician can try to calm and support the parent, with comments such as, “I don’t know who the trauma is worse for, the child or the parent.” “These teeth didn’t actually come out completely, and they were still able to soak in his own blood.” “Don’t give up hope; we see a lot of these types of traumas, and we’re able to restore their smiles.”
The following is a truly successful tooth story that outlines a scenario of a very scary moment for both mother and child, and how my team and I were able to put things back together as if no trauma happened at all.

A teenager’s avulsion tooth story
This 14-year-old boy was play-fighting with his brother in the kitchen with a broom. That broom hit him in the face and knocked out his front teeth.
Luckily, the young boy was undergoing orthodontic treatment so the avulsed teeth remained in the oral cavity. As you can see from the clinical photograph in Figure 1, teeth Nos. 8, 9, and 10 would not have remained in the mouth if the orthodontic wire was not in place.
Two days after treatment, the patient was seen in my practice after the teeth were splinted back in place by the orthodontist. Figures 2A-2B are the preoperative radiographs after the teeth were reimplanted.
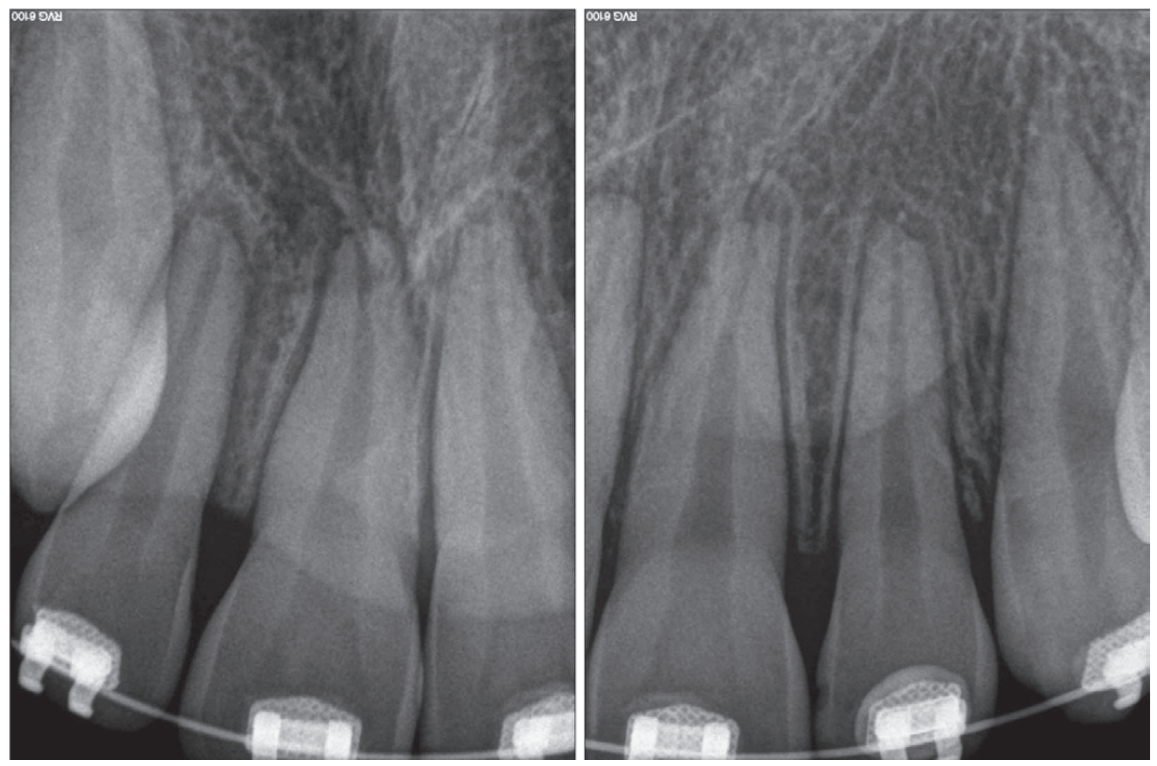
One can already appreciate the inflammatory resorption that is occurring at the apices of teeth Nos. 9 and 10. These images were taken just two days after the trauma.
My goal at the first visit was to understand the trauma with respect to the extraoral dry time of the teeth (how long were the teeth outside of the mouth), get a full picture of the type of trauma that occurred, and to make sure that the teeth were stabilized.
Endodontic treatment began a few days after my initial examination. We did not want to start treatment right away, but we also didn’t want to wait too long to start treatment — we needed to give the periodontal ligament a moment to restabilize prior to treatment so we didn’t get further unwanted consequences down the road. But if we waited too long, inflammatory resorption would start to set in, and we would start to lose tooth structure. Endodontic treatment should be started within 7–10 days after the trauma to avoid these two potential consequences.
Using calcium hydroxide in a dental trauma case
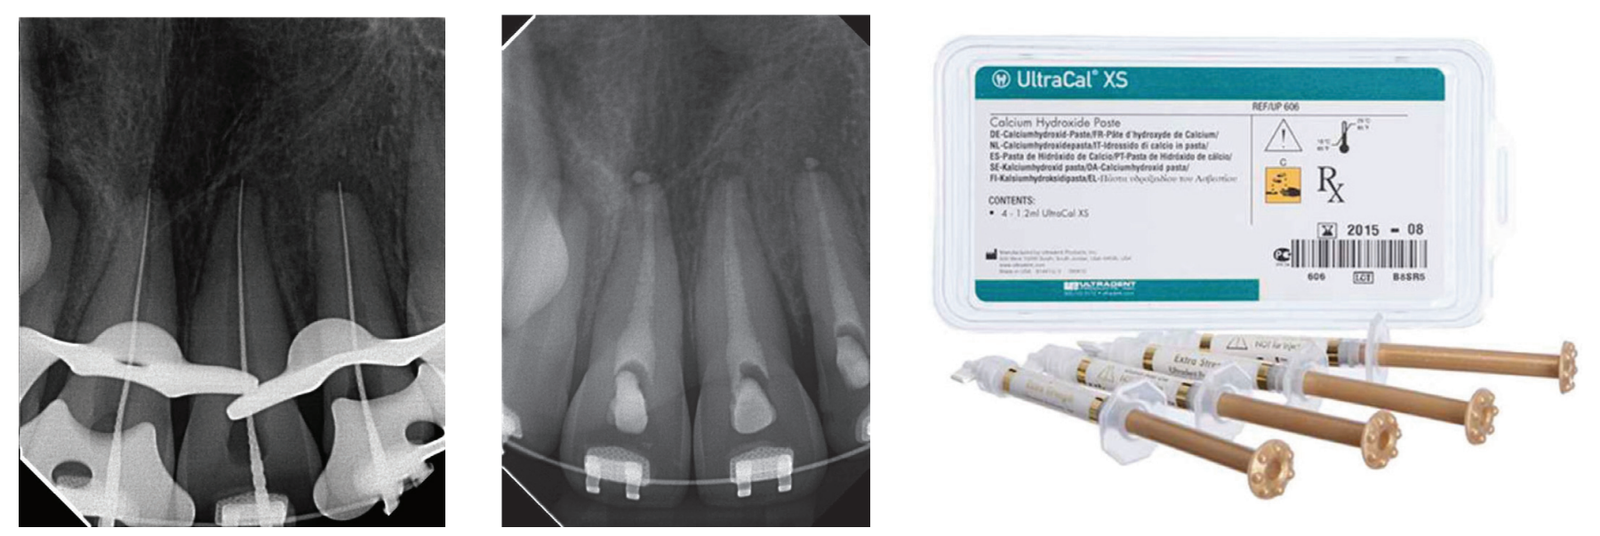
One of the most critical steps in treating dental trauma is making sure you don’t rush things. That means that obturation is often postponed until the patient is asymptomatic (i.e., no pain to percussion) and the periodontal ligament has radiographically re-established itself. Clinicians must also make sure the tooth is completely disinfected of bacteria. Both of these steps are achieved by placing calcium hydroxide as an intracanal medicament during the treatment as seen in Figure 4.
Calcium hydroxide has been shown to be extremely beneficial in the long-term retention of teeth after they have experienced trauma. It can arrest and even repair inflammatory resorption and eliminate harmful bacteria from the root canal system after trauma. Its antimicrobial properties come from its alkaline pH and its ability to dissolve necrotic tissue, bacteria, and their byproducts.1
My personal favorite calcium hydroxide product to use in these delicate clinical situations is UltraCal™ XS paste by Ultradent. It is syringeable, making it very simple to use, since there is no mixing involved. The syringe tip is thin and comes with a rubber stopper that allows placement of the material to be safe and contained within the canal.
Next steps in the post-trauma treatment process
As I mentioned earlier, in any dental trauma situation, you never want to rush the treatment. The key to success is to watch the periodontal ligament and how it heals. Once you see the ligament re-establish itself into its normal resting place, then you know that the teeth are ready to be obturated.
You will also notice that during the endodontic treatment phase of this case, the orthodontic wire was removed until the periodontal ligament could heal. You don’t want to over-stabilize the teeth during the healing process after trauma because this can induce replacement resorption (aka, ankylosis). Therefore, the orthodontic wire was removed during this time when the calcium hydroxide was placed.

From here (Figure 6), I could see that my gutta percha was slightly overextended so I trimmed my master cones a bit prior to permanently obturating the teeth here.
There was some sealer extrusion at the apex of these teeth (Figure 7), especially 10, but this was due to the inflammatory resorption occurring at the apex as a result of the trauma, which started to eat away the apical stop. I am confident that, over time, this sealer will resorb away, and this extrusion should not impede the healing at all. Figure 8 is the final outcome of the case.
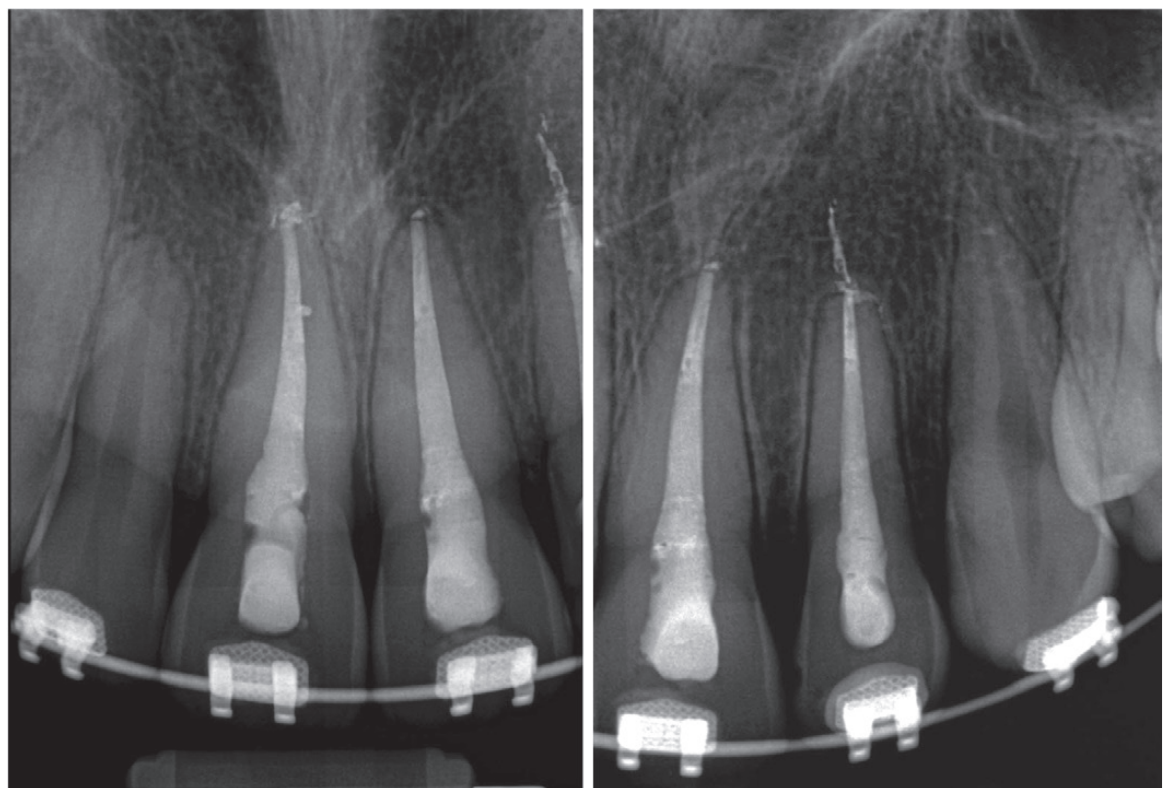
And now that the patient is stable, he can go back into his brackets and orthodontic wire. Figure 9 is him 6 months later, and we will continue to follow him up for the next 5 years.
Top tips to keep in mind
Dental trauma is distressing for patients and their loved ones, but when you can confidently reassure them that they’re in good hands, you’ll help them feel safe. And posttreatment, you’ll be their hero.
Some key points to remember following avulsion is:
- Stabilize the teeth and get a baseline for your diagnostic tests.
- Start root canal therapy 7–10 days after the trauma to preserve the PDL and avoid inflammatory resorption.
- Place calcium hydroxide in the teeth as the first step.
- Keep the teeth medicated (the medication may need to be replenished over time).
- Once the teeth are no longer tender to percussion and the PDL looks normal radiographically, the teeth may be obturated.
- Follow up with the patient after 1 month, 3 months, 6 months, 1 year, 2 years, 3 years, 4 years, and 5 years.
Read an interesting and unusual treatment for avulsed teeth in “Emergency treatment by intentional replantation using Pedialyte as a medium,” by Drs. Trent Lally and Kent Sabey here: https://endopracticeus.com/emergency-treatment-by-intentional-replantation-using-pedialyte-as-a-medium/
 Sonia Chopra, DDS, was the first female board-certified endodontist in Charlotte, North Carolina, where she founded Ballantyne Endodontics in 2008. As a mentor and impact entrepreneur, Dr. Chopra improves endodontic education for general dentists, dental residents, and patients. She is a TEDx speaker, Dentistry Today and Forbes contributor, and the author of Tooth Wisdom, a book designed to inform and empower patients in their own oral health. She teaches endodontists how to grow their practices and improve efficiencies in their workflows, so they can be more effective and profitable through her Heal Your Practice program. Dr. Chopra is also co-founder of A Night for Smiles, a gala bringing Charlotte-area dentists together to support dental health initiatives. She is an active member of the American Association of Endodontics and is a Key Opinion Leader for Sonendo, Dentsply Sirona, J Morita, and Kerr. When she’s not treating patients or teaching dentists about endodontics, she loves to travel, garden, and spend time with her family. Follow her on Instagram at @drsoniachopra.
- Zare Jahromi M, Kalantar Motamedi MR. Effect of calcium hydroxide on inflammatory root resorption and ankylosis in replanted teeth compared with other intracanal materials: a review. Restor Dent Endod. 2019 Aug 1;44(3):e32.
Stay Relevant With Endodontic Practice US
Join our email list for CE courses and webinars, articles and more..
