CE Expiration Date: March 22, 2026
CEU (Continuing Education Unit):2 Credit(s)
AGD Code: 070
Educational aims and objectives
This self-instructional course for dentists aims to review tooth anatomy and the location of canal orifices within that anatomy leading to the preservation of tooth structure when locating and accessing the canals.
Expected outcomes
Endodontic Practice US subscribers can answer the CE questions by taking the quiz to earn 2 hours of CE from reading this article. Correctly answering the questions will demonstrate the reader can:
- Understand the importance of cervical tooth structure and realize the tooth’s ability to manage loads under function.
- Identify access to the pulp chamber to preserve tooth
- Realize the benefit of a smaller orifice-directed access.
- Recognize some approaches to gaining access to anterior teeth, premolars, and molars.
Dr. Gregori M. Kurtzman writes how knowledge of tooth anatomy can help in preserving tooth structure.
Dr. Gregori M. Kurtzman discusses preserving sound tooth structure and gaining endodontic access
The endodontic component of treatment
The accepted goal of dental treatment the elimination of all decay. When treating the tooth endodontically, an accepted goal is removal of all decay. Any decay that remains weakens the tooth, which can allow the remaining decay to progress over time, leading to structural failure of the tooth. But the goal of restoration of the tooth is to preserve as much sound tooth structure as is feasible.
Thus, endodontic treatment is restoratively driven. If insufficient tooth structure remains after endodontic treatment is completed, then the tooth is weak and structurally will not last in the long-term. Therefore, preservation of healthy tooth structure is important. So, conservative endodontic treatment begins with understanding the tooth’s anatomy and where the canal orifices lay within that anatomy allowing us to preserve tooth structure when locating and accessing the canals.1
Cervical tooth structure and its importance
Teeth when loaded under function have forces directed in the long-axis in posterior teeth in the maxilla and mandible. Maxillary incisors due to the angulation to the opposing teeth (tipped facially with contact on the lingual aspect of the tooth) have their loads off-axis to the tooth’s long-axis. With that in mind, whether posterior or anterior teeth, forces concentrate at the cervical of the tooth2 (Figure 1). Therefore, teeth with a weakened cervical region will have a higher failure rate and have decreased ability to manage those loads under function than teeth with intact cervical areas. Maintenance of this important region of the tooth structure is critical to long-term survival of those teeth.

This is also important in instrumentation of the canals within the tooth and preserving as much cervical tooth structure as possible. Use of wider taper files (0.08-0.12 or greater) results in over-instrumentation of the canals by removing greater amounts of cervical tooth structure (Figure 2). So, selection of the ideal taper should be dependent on which tooth is being treated as well as the cervical size of the canal prior to treatment. Typically, in the majority of cases treated, finalization with a 0.06 taper file is sufficient in palatal canals of maxillary molars, distal canals of mandibular molars, maxillary central incisors, and all canines. All other teeth and canals typically can be effectively instrumented with a final 0.04 taper file. There will be exceptions to this, but wider taper files should be reserved for those rare clinical circumstances where a very wide canal is noted during diagnosis radiographically.

Initializing access
When the tooth to be endodontically treated does not have a crown present, but direct restorative material (amalgam or composite) is present, that needs to be addressed to access the pulp chamber. The old restorative materials and decay are removed so that only the necessary tooth structure needed to unroof the pulp chamber and locate the canal orifices will require removal. This aids in visualization of the tooth structure overlying the pulp chamber especially when treating posterior teeth. Additionally, preserving the important native tooth structure will contribute to long-term survival of the tooth.
Teeth with an existing crown can be a challenge as the practitioner loses anatomical reference to where the pulp chamber is oriented in the tooth, which is especially true with posterior teeth. The tooth may have been rotated or tipped prior to placement of the crown. Therefore, the pulp chamber and canal orifices may not be positioned based on the anatomy of the crown. As the crown will often require replacement following endodontic treatment, removal of the majority of the occlusal aspects of the crown to expose the underlying tooth structure improves visibility to unroof the pulp chamber. This avoids “rooting” around in a limited access through the crown that may lead to perforation in an attempt to locate the canal orifices and pulp chamber. Should the existing crown not be planned for replacement, or if there will be a period of time before the patient can replace the crown following endodontic treatment, access through the crown will be needed with preservation of its structure, and an understanding of the tooth’s anatomy is important. Ceramic crowns, especially zirconia monolithic materials, have become the predominate crown material. Access through zirconia can be a frustration to many practitioners due to its hard structure.
Initial penetration through the zirconia is accomplished with a medium-grit round diamond (Great White® Zirconia (GWZ) diamonds, SS White, Lakewood, New Jersey) centered on the occlusal surface in posterior teeth or lingual surface on anterior teeth3 (Figure 3). The diamond is used with light pressure outlining the access shape appropriate to the tooth being treated, while irrigation from the handpiece is used. This can also be utilized on other ceramic materials. Should any core material be present under the crown, that should be carefully removed to improve visibility as this will avoid inadvertent straying when trying to unroof the pulp chamber.

Access shape
Traditional access in molars for example was taught for many decades due to a poor understanding of the importance of preservation of tooth structure especially in the cervical aspect of the tooth. This involved a flared access that essentially removed most of the coronal aspect of the tooth, leaving thin walls on the mesial, distal, buccal, and lingual (Figure 4 left). As the understanding of the importance of preservation of coronal and cervical tooth structure improved, a more conservative access developed. This new access, termed “orifice directed” utilizes canal projection related to the coronal anatomy to preserve coronal tooth structure (Figure 4 right). Preservation of the lateral tooth structure is important as crown preparation will remove the lateral aspects of the tooth’s coronal and affect the ability to achieve restorative ferrule that can lead to restorative failure under loading.

Straight-line access into the canals in molars specifically in the past required the file to be vertical to enter the canal, which leads to removal of tooth structure. With a better understanding of canal projection, we see that as the canal approaches the pulp chamber, it actually leans to the opposite side of the tooth. This means that straight-line access into the distal canal in a mandibular molar for example, actually comes from the mesial side of the tooth and enters the mesial canals from the distal aspect of the tooth (Figure 5). With this in mind, a smaller orifice-directed access aids in coronal tooth structure preservation while allowing straight line access into the canals.

Anterior teeth
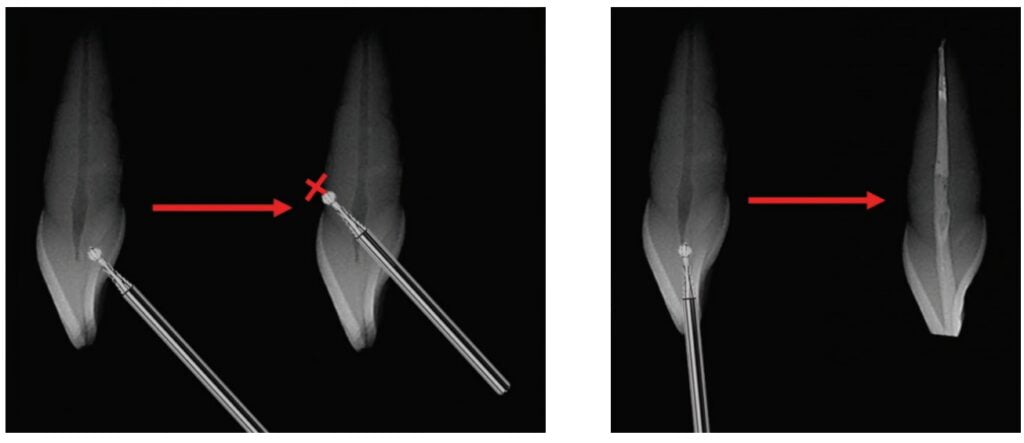
Access in anterior teeth has a potential problem when the anatomy is not well understood. Approach to the pulp chamber on the lingual at an angle can lead to perforation of the facial cervical in an attempt to locate the pulp chamber, which becomes more likely in older patients where some calcification of the pulp chamber has occurred (Figure 6). As the canal runs down the center of the root, access needs to be parallel to the long-axis of the tooth and is through the incisal edge to drop down into the chamber and canal (Figure 7).
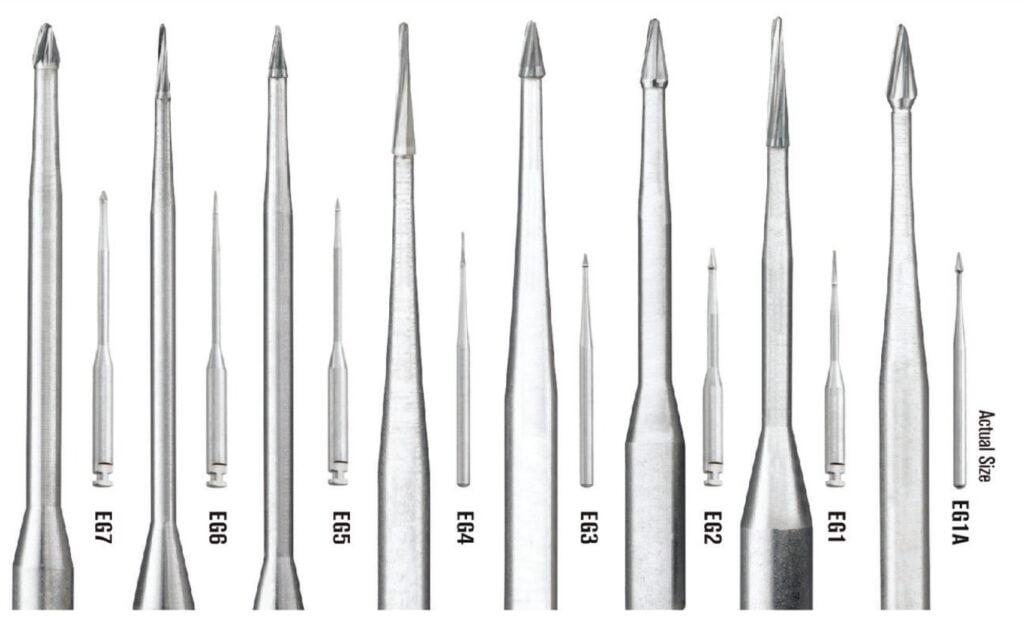
Utilization of burs designed for orifice location are key to simplifying access, and how they are used prevents accidental perforation or transportation of the canal. EndoGuide® burs (SS White) are conical-shaped carbide tips on a long shaft available various shapes for either friction grip (FG) (highspeed) or latch pin (slowspeed) handpieces (Figure 8). While there are other similar burs, the unique shape of the cutting blade makes these burs unique in accomplishing tooth conservation, in the author’s opinion. The instrument allows precision guidance to and into the canal orifice while preserving tooth structure. With the anatomy in mind, the maxillary anterior access will be centered on the incisal edge (Figure 9 left) or slightly lingual to the incisal edge (Figure 9 right). Initial penetration into the tooth is made with standard carbide bur (330 or round) then continued with an appropriate EndoGuide bur or can be performed only with the EndoGuide bur. An alternative to prevent bur run-off and ledging is to use the EndoGuide bur for the initial access preparation due to its self-centering micro tip. Once the canal orifice has been identified, a handfile is used to explore the canal to ensure a glide path to working length (WL) is present. Depending on the size of the canal, a No. 6, 8, 10, or 15 initial file may be required (Figure 10). Progressive handfiles are used until a size 20 hand file reaches working length (WL).

Mandibular incisors are similar anatomically to maxillary incisors with access made through the incisal edge as this overlies the canal orifice and permits straight-line access to the canal (Figure 11). Ethnic variances should be considered as it has been reported that a percentage of the Asian4 and Middle Eastern5 population present with two canals in the mandibular incisors (Figure 12). These may converge into a single canal in the apical portion of the root but will require instrumentation of both canals in the coronal portion of the root.


Premolars
Maxillary and mandibular premolars may present with one or two canals. When initiating endodontic access on a premolar, access is made at the center of the tooth into the pulp chamber. When a single canal is present, it will lie centered in the tooth (Figures 13 and 14 left). Should this not be identifiable; two canals may be present, and access needs to be expanded towards the cusp tips as the canal orifice will lie under where the cusp tip would be present (Figure 14 right). If the orifice cannot be identified, use of transillumination of the tooth by placement of a dedicated transilluminator on the buccal or lingual tooth may be necessary (Figure 15). In the absence of a transilluminator, a fiber optic handpiece may be used. Without a bur in the handpiece, place the head where the fiberoptic lights are on the tooth, and press the rheostat (foot pedal). The orifice will appear as a dark spot when the tooth is transilluminated.

Another consideration is when radiographically the canal disappears in the apical half of the premolars root and is prominent in the coronal aspect. This indicates that the canal has divided into two canals (Figure 16). Exploration with small handfiles along the buccal or lingual portion of the identifiable canal will allow a glide path to the two narrow canals to WL.

Molars
Maxillary and mandibular molars differ in how many roots and canals they have but are approached in a similar manner. As molars predominantly have been previously restored, they may have restorative material or a crown present. Following access as previously described, the orifices are identified. Should the EndoGuide bur be used, it is important that it should not be advanced into the orifice further than its head length to avoid the potential for transportation of the canal or perforation of the root (Figure 17). The bur is also used to remove any overhang of the chamber’s walls that may hamper file insertion into the canal.
Anatomically, the pulp chamber in maxillary molars lies more over the buccal half of the tooth (Figure 18). Identification of the canal orifices in these teeth is aided as a darker line can be observed on the chamber floor connecting the mesial, distal, and palatal orifices. When a mesial buccal 2 (MB2) is present, this will lay along a line between the mesial and palatal orifices requiring additional removal of tooth structure to access it. The MB1 should lie under the MB cusp tip, and if it does not, the MB2 may have to be identified, and further extension to the MB cusp is needed to MB1.

Mandibular molars typically present with three canals, with a single canal on the distal with the orifice centered between the buccal and lingual (Figure 19 left). Should the distal orifice not be centered on the distal, a second distal canal should be suspected, and extension of the access needs to be widened buccal-lingually to find the other orifice (Figure 19 right). If two distal canal orifices are identified, these may be two separate canals, or they may converge as they progress apically.
Completing instrumentation
Following access to the pulp chamber and identification of the canal orifices in any tooth, the canal is explored to WL with hand files to establish a glide path. Once WL has been established, rotary files such as the DCTaperH™ or ExactTaperH DC™ (SS White) are utilized to instrument the canal (Figure 20). First a size 17 file in the appropriate taper (canal and tooth dependent) is taken to WL, which is followed by a size 20, and then 25 file. Completion of instrumentation will be dependent on the tooth being treated with preservation of cervical tooth structure as the treatment goal. Following these guidelines, critical cervical tooth structure has been preserved, and the tooth is ready for obturation.

Conclusion
The practitioner may be able to find, instrument, and obturate the canals in the tooth, but if tooth structure is not preserved especially in the cervical area where the majority of functional loading occurs, long-term survival of the tooth is questionable. A conservative approach to endodontics that is restoratively driven aids in preservation of tooth structure that cannot be replicated with restorative materials. Instruments utilized to access the canal orifice play an important factor, as well as the taper to which the canals are instrumented so that critical cervical tooth is preserved.
Preserving tooth structure is part of minimally invasive endodontics. Read Dr. Stephen R. Ottosen’s article on the topic, “The foundation of minimally invasive endodontics: research, technology, and technique,” at https://endopracticeus.com/the-foundation-of-minimally-invasive-endodontics-research-technology-and-technique/
Author Info
 Gregori M. Kurtzman, DDS, MAGD, FPFA, FACD, FIADFE, DICOI, DADIA, DIDIA, in private general dental practice in Silver Spring, Maryland, was a former Assistant Clinical Professor at University of Maryland in the department of Restorative Dentistry and Endodontics, and a former AAID Implant Maxi-Course assistant program director at Howard University College of Dentistry. He has lectured internationally on the topics of restorative dentistry, endodontics and implant surgery, removable and fixed prosthetics, and periodontics and has over 800 published articles globally, several ebooks, and textbook chapters. He has earned Fellowship in the AGD, American College of Dentists (ACD), International Congress of Oral Implantology (ICOI), Pierre Fauchard, ADI, Mastership in the AGD and ICOI, and Diplomat status in the ICOI, American Dental Implant Association (ADIA), and International Dental Implant Association (IDIA).
Disclosure: In the past, SS White has provided lecture support to Dr. Kurtzman.
References
- Tang W, Wu Y, Smales RJ. Identifying and reducing risks for potential fractures in endodontically treated teeth. J Endod. 2010 Apr;36(4):609-617.
- McCoy G. Occlusion confusion. Gen Dent. 2013 Jan-Feb;61(1):69-75; quiz 76.
- Kurtzman G. Solving Ceramic Crown Removal and Endo Access Challenges. Dentistry Today. December 1, 2020. https://www.dentistrytoday.com/solving-ceramic-crown- removal-and-endo-access-challenges/. Accessed February 10, 2023.
- Usha G, Muddappa SC, Venkitachalam R, Singh V P P, Rajan RR, Ravi AB. Variations in root canal morphology of permanent incisors and canines among Asian population: A systematic review and meta-analysis. J Oral Biosci. 2021 Dec;63(4):337-350.
- Rahimi S, Milani AS, Shahi S, Sergiz Y, Nezafati S, Lotfi M. Prevalence of two root canals in human mandibular anterior teeth in an Iranian population. Indian J Dent Res. 2013 Mar-Apr;24(2):234-236.
Stay Relevant With Endodontic Practice US
Join our email list for CE courses and webinars, articles and more..
