In his fourth article on endodontic skills, Dr. Tony Druttman makes a strong case for using the rubber dam
 This article is part of a series that will help to make the practice of endodontics easier for you. Some of the information will give you a better understanding of what you are dealing with, some will make it easier to avoid pitfalls, some will show you how to improve the quality of your work, and some will advise you what to do when you get into difficulties.
Although each article covers a specific topic, they interrelate, and some of the questions that arise may be answered in other articles. By nature, it cannot be comprehensive, otherwise it would be a textbook, but hopefully, it will give you valuable practical information.
Aseptic conditions
One of the cornerstones of endodontic treatment is to work under aseptic conditions. This is a fundamental principle of any kind of invasive surgery. A surgical operation on any other part of the human body requires the use of surgical drapes to cover those areas not involved in the surgical field to prevent bacterial contamination. Yet, when it comes to endodontic treatment, procedures are often carried out without proper isolation, and this undoubtedly has a negative effect on the chances of success.
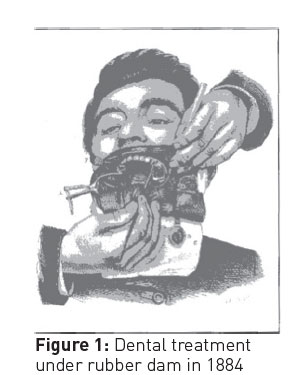
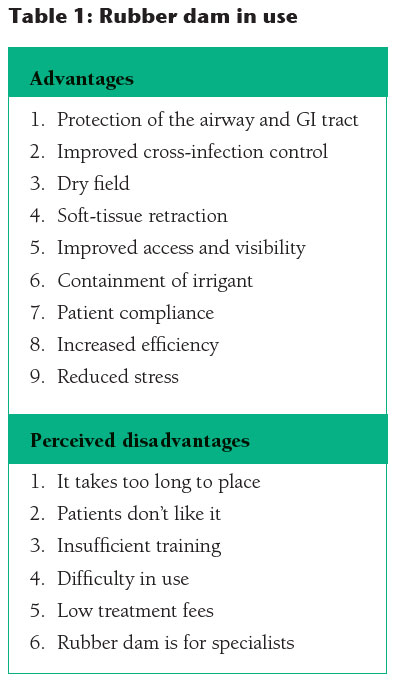 The rubber dam has been available since 1864 (Figure 1), and yet has not been universally adopted for endodontic treatment, let alone other restorative procedures, even though there are many benefits to the operator, assistant, and patient. Table 1 shows the recognized advantages of using a rubber dam, along with commonly used reasons for not using one.
Surveys on rubber dam usage suggest that while frequency of use is high among undergraduates, only a minority of GPs use rubber dams routinely for endodontic procedures, and a significant proportion never use it. Patient surveys show that the vast majority of patients like its use, and this is certainly confirmed in my own practice. I have been asked many times why other dentists do not use it, and in 30 years, I have only had one patient who refused its use.
Like with anything else, the technique has to be mastered, and proficiency increases with use. There can be a lot of confusion with all the different techniques and instruments, and yet once the technique has been mastered, carrying out endodontic treatment without a rubber dam is inconceivable, like riding a motorcycle without a crash helmet. Isolation of the tooth effectively gives the practitioner the confidence to use sodium hypochlorite and hand instruments without the risk to the patient. Endodontic procedures are carried out more efficiently, and both the dentist and the nurse can focus on the treatment rather than other issues.
Choice of clamps
Although there are many different clamps on the market, and the choice can be quite daunting, ultimately everyone has his/her favorites. I use no more than five or six different clamps, but I do vary the technique according to individual situations.
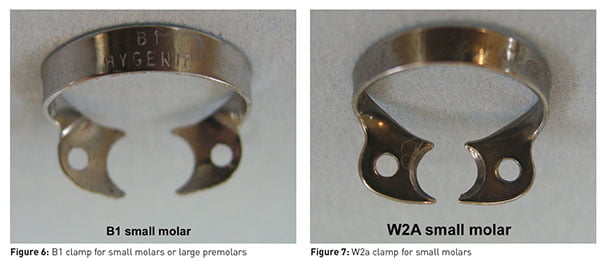
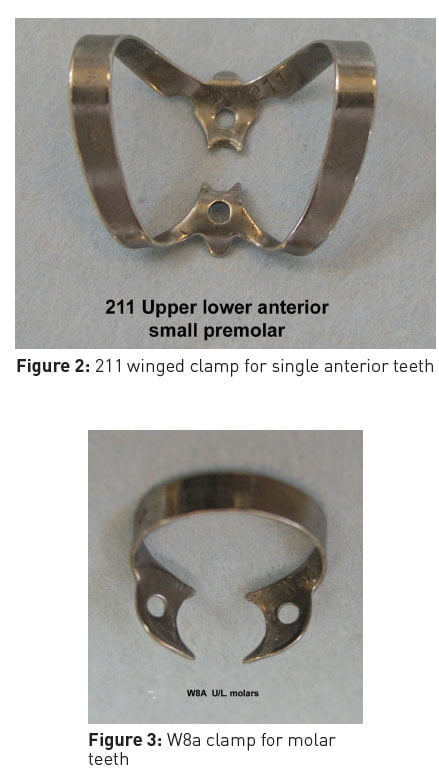 While waiting for the anesthetic to take effect, look at the occlusal view of the tooth to be treated, and evaluate the tooth profile at the gingival margin. Winged and wingless clamps are available, but they require different technique of application. My personal preference is for wingless clamps in the posterior region and a winged 211 clamp (Figure 2) for anterior teeth. Most lower molars and some uppers with a rectangular footprint will take a W8a clamp (Figure 3). Upper molars that are wider on the buccal than the palatal, will need a B2 or B3 (Figure 4). Some colleagues prefer the Tiger winged clamps because of their serrated edges (Figure 5). Small molars might be better with a B1 clamp (Figure 6) or even a W2a (Figure 7).
Technique
First try the clamp without the rubber dam, and check for four-point contact. When the dam is placed and stretched using the frame, this causes a tipping force against the bridge of the clamp. If there is inadequate contact between the beaks of the clamp and the tooth, it may cause the clamp to move. Once the chosen clamp is in place, try to rock the clamp with your finger.
When there is insufficient coronal tooth substance to stabilize the clamp, other techniques may be used. If the tooth to be treated is not the last in the arch, then a double clamp technique can be used (Figure 8). For instance, if a broken down first molar requires root treatment, three or four separate holes are punched in the dam, and a clamp is placed on the second molar. The exact position for each hole can be easily determined by using a rubber dam stamp on the sheet of the rubber dam. The dam is then stretched over the clamp and positioned to isolate each tooth in turn. A second clamp is then placed on the first molar to hold the rubber against the margins of the first molar.
Isolating quadrants is a very useful technique when you don’t have exactly the right clamp for the tooth and also for restorative dentistry carried out under the rubber dam.

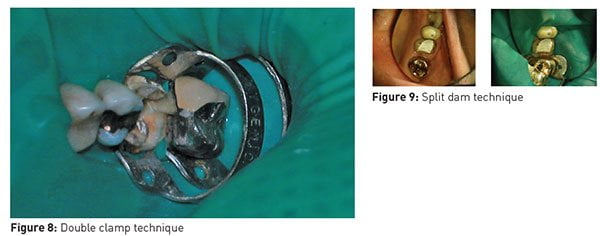 Another useful technique for posterior and anterior teeth is the split dam technique where no clamp is placed on the tooth in question (Figure 9). The important thing here is to make sure that there are no gaps between the dam and the tissues. Anterior teeth do not always need a clamp at all. A number of teeth can be isolated and the dam held in place with widgets. If there is any leakage of saliva around the dam, this can cause bacterial contamination of the root canals. Leakage can be prevented with OraSeal® (Ultradent Products Inc.) caulking material.
When you are faced with a challenging isolation situation, think laterally. The more you use the clamps, the better you will judge the right clamp. A short period of familiarization with the various techniques will allow you to become adept, and you will never look back.
Once the techniques have been mastered for endodontics, and you are confident in isolating quadrants, you will find other clinical applications. Most restorative procedures are more successful and easier to achieve when working in a dry field, especially placing composites. Teeth can be prepared for crowns under the rubber dam (although margins are usually finished without), and indirect restorations can be cemented similarly (no chance of dropping the restoration down a patient’s throat).
Conclusions
Using a rubber dam makes dentistry easier, faster, safer, and more satisfying for the operator and the assistant. It allows you to deliver a better quality of care, a better experience for your patients, and can be one of your powerful USPs (unique selling points). Rise above the rest.
Next issue: Access cavities and canal location
Stay Relevant With Endodontic Practice US
Join our email list for CE courses and webinars, articles and more..

 Endodontic specialist Tony Druttman, MSc, BChD, BSc Dr, has extensive expertise in treating dental root canals, resolving difficult endodontic cases, and saving teeth from being extracted. His two London practices, one in the West End and the other in the City of London, are restricted to endodontic treatment. www.londonendo.co.uk