In the first of a series of ten articles on endodontics, Dr. Tony Druttman provides some valuable insights into the anatomy of the root canal
This series of short articles is designed to offer practical advice on some of the most common challenges that we face in endodontics. The purpose is to make the practice of endodontics easier. Some of the information will give you a better understanding of what you are dealing with, some will make it easier to avoid pitfalls, some will show you how to improve the quality of your work, and some will advise you about what to do when you get into difficulties. Although each article will cover a specific topic, they will interrelate, and some of the questions that arise may be answered in other articles. By nature, it cannot be comprehensive, otherwise it would be a textbook, but hopefully, it will give you valuable practical information.
I hope you enjoy the series, and if you find you have difficulties that are not covered, please get in touch, and I will attempt to answer your questions.

Anatomy
Like any other operation or procedure on the human body, you have to know where you are going before you embark on endodontic treatment. The access has to be accurately judged and the minimal amount of tooth removed to achieve the desired result. There are some questions that you have to ask yourself before you start.
- What is the anatomy of the tooth?
- How many roots are there?
- Are any of those roots curved?
- How many canals are there likely to be?
- Are there any particular pitfalls that I should be aware of?
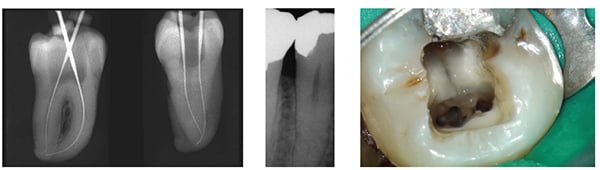
You gain knowledge of the internal and external anatomy of the teeth by looking at the textbooks, looking at extracted teeth, taking good quality radiographs, and experience. It helps to have a spatial awareness so that you have a three-dimensional picture of the tooth in your mind. You don’t have to carry the figures in your head, but it is a good idea to know that the vast majority of upper first molars have a second mesio-buccal canal (Figure 1), and there is a very good chance that lower incisors will have two canals. What this means is that you have to know where to look, without removing excess tooth tissue. There would be no point in destroying vast amounts of the tooth and making it unrestorable.
Radiographs

Assuming you know what you are looking for, and you know where to look, you start by taking a periapical radiograph (Figure 2) and possibly two radiographs from slightly different angles (Figures 3A and 3B) so that from the two images, you can build up a three-dimensional picture in your mind as to what the tooth would look like or what the problem may be.
It is important to remember that when looking at a radiograph, you only see a two-dimensional image of a three-dimensional object. You will see curves in the mesio-distal plane, but not in the bucco-lingual or bucco-palatal plane. The curves that are not seen are just as important as the ones that are visible. Next time you extract a tooth, have a look at it in the same plane as you would see it on a radiograph, then turn it 90 degrees (Figure 3).
A good quality radiograph is mandatory, and I will explain the ways to get the best quality radiograph in the third article of this series.
The radiograph will give you vital information on:
- The number of roots
- The length of the roots
- The curvature of the roots
- The thickness of the roots
- The size and position of the pulp chamber
- The size of the canals
- Pathology in the bone associated with the tooth
The radiograph may tell you if the canal divides along its length. The clue is if it suddenly disappears or becomes very thin part way along the length of the root (Figure 4).
The radiograph won’t tell you if there is curvature of the roots in the plane you cannot see, as I have mentioned before. It will also not give you any idea of the cross-sectional shape of the canal. Many root treatments have failed, not just because canals have been missed, but because the clinician has not appreciated that the canal is oval in cross–section rather than round. The classic ones are the palatal canals of upper molars and the distal canals of lower molars.
The radiograph will not tell you that there may be three canals in the mesial root of a lower molar (Figure 5). It doesn’t happen very often, but any missed canal can cause a failure. You have to look carefully, which will probably require the use of additional magnification and illumination, something I will be talking about in the sixth article in the series.
Bacteria
Most endodontic disease is caused by bacteria getting into the root canal system. We know that the system is complex from the work of Walter Hess in the 1920s. It is not possible to remove all the bacteria from the system once the tooth has become infected. What we hope to do is to remove as many of the bacteria from as much of the root canal system as we can reach. This involves the use of a combination of mechanical instruments and chemical irrigants. The root filling itself can deny space for the bacteria and nutrients, and entombs the residual bacteria. In spite of our deficiencies in removing all of the bacteria, very predictable results can be achieved with a high level of success. We often only find out the existence of lateral and accessory canals after obturation (Figures 6A and 6B, 7A and 7C).


It is important to understand what happens to the anatomy of the root canal system physiologically over time and pathologically with the ingress of bacteria.
Physiologically, the pulp chamber and the root canals reduce in size as the tooth ages (Figure 8). Add to that caries and dentistry, and they will sclerose further and faster because the pulp is trying to protect itself from the insult by laying down tertiary or reparative dentin (Figure 9). The canal may not be apparent on the radiograph, but more often than not it is there, albeit, very small and perhaps only visible with the aid of a microscope. Canals sclerose from coronal to apical, and the dentin laid down has a different appearance. Microscopically, it is more irregular than secondary dentin, and macroscopically, it has a different color and texture. Often a little judicious and strategic removal will result in a positive outcome with minimal loss of coronal tooth tissue (Figure 10).
Next month: Diagnosis
 Endodontic specialist Tony Druttman, MSc BChD BSc, has extensive expertise in treating dental root canals, resolving difficult endodontic cases, and saving teeth from being extracted. His two London practices, one in the West End and the other in the City of London, are restricted to endodontic treatment. www.londonendo.co.uk
Stay Relevant With Endodontic Practice US
Join our email list for CE courses and webinars, articles and more..
