In the fifth article of the series, Dr. Tony Druttman discusses how to make the preparation of the root canals easier
This article is part of a series that appears in 10 consecutive issues and is designed to offer practical advice on some of the most common challenges that endodontists face. The purpose is to make the practice of endodontics easier. Some of the information will give a better understanding of what endodontists are dealing with, some will make it easier to avoid pitfalls, some will show how to improve the quality of endodontic work, and some will advise what to do when difficulties arise.
Although each article covers a specific topic, they interrelate, and some of the questions that arise may be answered in other articles. By nature, it cannot be comprehensive; otherwise it would be a textbook, but hopefully, it will give valuable, practical information.
The importance of access
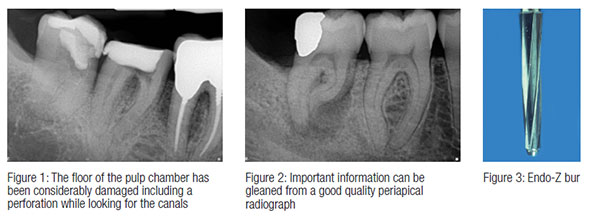
A well-known endodontist, Dr. Frank Weine, coined the adage “Access is success.” What this means is that if you get the access cavity design right, it makes the preparation of the root canals much easier. The access cavity should be large enough so that direct line access to the canals can be achieved, but small enough so that as much of the coronal tooth tissue as possible can be preserved. In the 21st century, we are asked to root treat all types of teeth including third molars. The oldest patient referred to me for endodontic treatment was 99 years old, and many of the teeth we have to deal with have suffered the ravages of dentistry before we treat them. Often finding the canals can take longer than shaping them. You have to follow some basic rules. You have to know where to look; otherwise, a large amount of tooth tissue can be unnecessarily destroyed and the long-term prognosis for the tooth affected (Figure 1).
A good quality preoperative long cone periapical radiograph gives important information about the depth of the pulp chamber, the mesiodistal position of the canal or canals, the canal curvature, and whether the canals divide along the way (Figure 2). The pulp chamber and the canals reduce in size through life as secondary dentin is laid down, but they also react to trauma and insult, and tertiary or reparative dentin can be laid down to completely or partially obliterate the pulp chamber and canal, especially in the coronal part. This was discussed in the third article of this series on radiography (Endodontic Practice US, September/October 2012).
The pulp chamber and the root canals should flow one into the other so that instruments can be introduced into the root canals without hitting obstructions on the way. Once entry into the pulp chamber has been achieved, the preliminary shape of the pulp chamber can be created using safe-ended Endo-Z burs (Dentsply Maillefer) [Figure 3]. This allows the walls to be shaped without damaging the floor of the pulp chamber. Once the canals have been located and the first instruments placed, a sense of the canal anatomy starts to form, and the access design may have to be modified during canal preparation as progressively larger and stiffer rotary instruments are used.
Canal positions
Basic canal positions can be found in any textbook on endodontics, so this is not the place to repeat the information. However, it is worth reminding readers how to find an MB2 canal in upper molars. Inability to find the MB2 canal is the most common cause for failure of endodontic treatment in upper molars (Figures 4A and 4B). The incidence varies depending on the papers you read (and how adept the authors are at finding them). The range seems to be about 70-90%, so the answer is always: look for the canal.
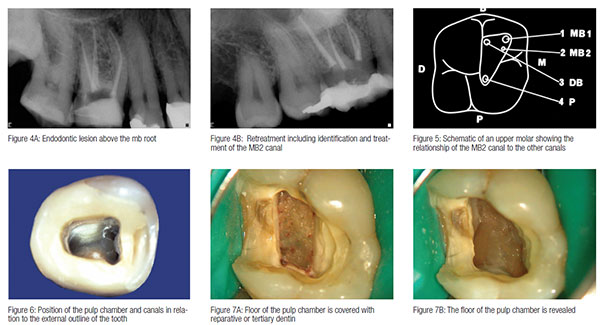 For those of you who did not see the earlier article on anatomy in the series, I repeat the schematic diagram to show the relative positions of the canals in an upper molar. Draw a line between the palatal canal and the MB1, and then drop a perpendicular line from the DB canal to the line between the other two canals. You will usually find the MB2 where they intersect (Figure 5).
There are basic rules about canal position which, if followed, make canal location easier and conserve tooth tissue.
- The floor of the pulp chamber is always located at the center of the tooth and at the level of the CEJ (Figure 2).
- The walls of the pulp chamber are concentric to the external surfaces of the tooth at the level of the CEJ (Figure 6).
- The CEJ is the most consistent landmark in locating the position of the pulp chamber.
- Except for maxillary molars, the orifices of the canals are equidistant from a line drawn in a mesiodistal direction across the floor of the pulp chamber (Figure 6).
- The pulp chamber floor is always darker than the walls (Figure 6).
- The orifices of the root canals are always located at the junction of the walls and the floor (Figure 6).
Difficulties
Often, we experience difficulties in being able to recognize the difference between the roof and the floor of the pulp chamber. If the roof is not removed, then canals can never be cleaned properly, and there will always be a source of bacteria to contaminate the canal system (Figure 7A). It is therefore necessary to examine the floor of the access cavity carefully to determine that any tertiary dentin has been removed (Figure 7B). Small long shank burs are then used to remove pulp stones over the canal entrances, and remaining pulp stones in the canals themselves (Figure 8) can be removed with ultrasonic files. It is helpful, of course, to do this under magnification and with good light, but more about that in the next column on magnification and illumination.
Check radiographs
Occasionally canals that are very clear on a radiograph can be very difficult to find, often in crowned teeth where the natural shape of the coronal tooth tissue has been lost. In these cases, it is important to take check radiographs to ensure that a new canal is not being created, heading off towards the periodontal membrane (Figure 10). In heavily restored, damaged, or traumatized teeth, the canal may be sclerosed and difficult to locate. The radiograph may well not even show the presence of a canal.
 The canals always sclerose from coronal to apical, and very often, there is a trail left behind where the canal used to be. If you follow that trail, you may well find the canal, but this does usually require the use of magnification. If having created a reasonable access, you are unable to find the canals, the best thing to do is to stop and refer the case to a more experienced colleague, preferably a specialist endodontist, who should have the skill and the equipment to locate the canals and complete the case. Sometimes the wisest course of action is to assess the case from the preoperative radiograph and refer the patient before you start. That way, you don’t cause unnecessary damage to the tooth and spend a great deal of unproductive and frustrating time.
Next issue: Magnification and illumination
 Tony Druttman, MSc, BChD, BSc, has extensive expertise in treating dental root canals, resolving difficult endodontic cases, and saving teeth from being extracted. His two London practices, one in the West End and the other in the City of London, are restricted to endodontic treatment. www.londonendo.co.uk
Stay Relevant With Endodontic Practice US
Join our email list for CE courses and webinars, articles and more..
